Tuesday, August 30, 2011

How to freeze peaches

Our local supermarket recently had peaches on sale for super cheap.  It was the lowest price I have seen in a very long time.  I bought 16 pounds with the intention of freezing them to use over the winter.  They were really firm when I brought them home so I put them in paper bags for a few days so they could soften up.  Once they were ready I washed them them and started a pot of water boiling.
 I boiled the peaches in water for 30 seconds
 Then moved them to an ice bath.  This helps to remove the skins.  If you don't find that the skin slides right off repeat the boiling/ice bath process.
 I took all the skins off.  Some came off a little easier then others.
 Cut all the peaches up into slices and remove the pit.  For each quart of peaches, combine 1/4 tsp ascorbic acid (to prevent browning) with 1/4 cup water.  Sprinkle over the peaches. 
Add 2/3 cup sugar per quart of peaches and mix gently.
 Place the peaches in freezer bags labeled with the date.  I use a straw to suck out the extra air.  They are now ready for the freezer.
When ready to use, thaw and they will be ready for pies, cobblers, or smoothies.

Monday, August 29, 2011

Disneyland Map Redo

Last December we took our first family vacation to Disneyland.  I had been there a couple times but my husband never had.  My boys loved every minute of it and were sad when we had to leave.  Being that my 5 year old really likes maps we picked one up for him on our way out.  It has been put up and moved several times so the edges were starting to look tore up.  I know we won't be going back for some time so want to make sure we keep it in the best shape possible.  After thinking of some ways to preserve the map I came up with a plan that I thought would look really cool.  I plan to do several map projects in his room with this being the first.

I started by taking the measurements of the map and then removing it from the wall.
 My plan was to have it look like the map had a border around it so I got 4 canvas' that are bigger then the actual map.  I painted them gloss black.  I started with acrylic paint but didn't like the way it looked so painted a couple coats of spray paint over the top.
 Next I cut around the edge of the map to take off the extra white boarder that was tore up.  I then cut it into 4 sections.
 After laying the 4 canvas' out on a table and figuring out the placement of each map section I used Mod Podge to stick them to the canvas.  I ran my hands over it to get the air bubbles out and make sure it was as smooth as possible.
 Once the Modge Podge was dry I let my son paint a top coat of Mod Podge to protect the map.  He loved being able to help on a project for his room.
I have not been able to hang it in his room yet so I took a picture laid out on our carpet.  I love the way it turned out.  Now my son can look at it and point out the rides without getting it dirty or ripping it.  He loves that he will now have his own piece of "art" to hang in his room.
 

Friday, August 26, 2011

Freebie Friday


I received a few fun freebies in the mail this week.
The Honey Nut Cheerio sample was eaten before I got a picture but you can find the offer here.
The salad coupons and clip are from Vocalpoint and the Tampax is from an offer that is no longer available.  Sorry I can't remember where I signed up for the tabs at.

Hope you have a great weekend and open your mailbox to find a fun freebie.

Thursday, August 25, 2011

Thrifty Thursday

This past weekend was a huge community garage sale with over 200 yard sales.  It was a lot of fun but super crazy with the swarms of people.  Parking was difficult.  We had to park and walk around to several yard sales in fear we might not find another parking spot. 
I took my 5 year old with me as he is always begging to go.  He took his little baggie of money and was so excited to be there with me.  I was so proud how he would go up and ask the price and then give them the money.  His favorite purchase was the cat scratching thing that he paid $.50 for.  He ran straight in the house when we got home to show it to his cat, Cheeto.
 As you can tell by the items purchase, my son bought far more then I did.  He actually got all the sand toys, the little pirate hat and a couple other things for free.  He is really into Halloween and skulls so he is always on the lookout for them.
 Total we spent about $14.  We only hit 15 yard sales before getting tired and heading home but it was a fun morning and I really enjoyed spending it with my son.

Tuesday, August 23, 2011

When a meal doesn't turn out as planned

Last week I purchased a couple of cookbooks.  I have been reading them and marking all the recipes I thought would be a hit with my family.  One recipe stuck out to me and sounded really good.  I was so excited the make it that I had it the next day.

All day I smelled the yummy dinner cooking away in the slow cooker.  When it was time for dinner I couldn't dish it up fast enough.  One of the down falls of a slow cooker is the torture of smelling it all day while it cooks.  :)

We all sat down to eat, prayed and took a bite.  Instantly we all looked up from our food.  I stood up and said "Get your shoes on, we're going out to dinner." 

Just because something sounds good, has all the ingredients in the dish that you love and smells great....does not mean it tastes great.

Hope you are having a great Tuesday and have a successful dinner.

Monday, August 22, 2011

Initial Collage Painting

 A few weeks ago I saw this project on a linky party.  I wish I would have made note of the blog I saw it on.  If it is yours please let me know.  Anyway, I liked it instantly.  I have always enjoyed making collages so this was a fun project. 
 I started out by getting a canvas.  I cut out several colorful pictures from magazines.  Sadly the only magazine in our house was ESPN so a lot of them are sports related but I still love all the colors.
Next I laid them on the canvas to figure out how I wanted them to go.  I then took them off, painted the canvas with Mod Podge and placed them back on.  I smoothed them out as much as I could and got the air bubbles out.  I then let it dry over night.
 The canvas I chose just happened to be the same size as the scrapbook paper I had so I used my Cricut and cut out a letter A with the fit to page option.  This allows the Cricut to cut out  the biggest letter that will fit on the page.
 I then placed the letter on the canvas where I wanted it to go.  Some how when I started painting it I moved it down so it isn't as centered as I would like but it still looks great.
I painted three coats of paint.  The first is a vanilla color.  Then I used a dark blue mixed with the vanilla to make a light blue.  I then used the dark blue mixed with a bit of water to make it streaky.  I love how the color turned out and you can see the different layers of color.
I love having lots of brightly colored art in my house and this piece definitely fits the bill.  I love how easy it was to make and how you can see different parts of the collage showing throw.

Linked up to Today's Creative Blog!

Sunday, August 21, 2011

Menu Plan- August 21st - 27th

Last week I bought The Everything Slow Cooker Cookbook.  I love to use my slow cooker so I was excited to have a book full of new recipes to try.  The majority of our menu plan this week is coming from my new cookbook with a few quick meals thrown in.

Breakfasts:
oatmeal/cereal
bagels with cream cheese and bananas
french toast
pancakes
eggs and toast

Lunches:
left overs
lunch out
bagel pizzas
sandwiches with chips and fruit

Dinners:
salisbury steak casserole
bacon, ranch and chicken mac n cheese
swiss steak, carrots and mashed potatoes
southwestern cheese soup, salad and corn chips
blt sandwiches, fruit and chips
corn tortilla casserole and salad
dinner out for a friends birthday

Friday, August 19, 2011

Freebie Friday

Sorry it has been a week since I posted.  We have had a crazy week and the blog came in last place.  I am back and hopefully energized.
This past week I received a sample of Downy Unstoppable.  I signed up for this on Facebook.
I also received a sample of Mott's for Tots apple juice.  As soon as this arrived it was quickly claimed by a two year old.  I had to fight him just to take a quick picture.  Vocalpoint sent me this freebie along with some coupons.  If you haven't signed up for Vocalpoint yet I suggest you do, they send a lot of great freebies.


Thursday, August 11, 2011

Thrifty Thursday

My boys and I stopped by a couple yard sales last week.  I don't usually take the boys with me so they were very excited to pick out a couple things.  My youngest picked out the hats and my oldest picked out the mask and plane.  I was happy to find a big cutting board for $1 and a serving tray to use for a project like I did here.  I spent $2.95 for everything shown.  Not a great week but the boys enjoyed it.

Tuesday, August 9, 2011

Apple Pie Muffins

My family loves to eat muffins for breakfast.  They are quick and easy to make ahead so we aren't rushing around trying to find something to eat.  One of our favorites is Apple Pie Muffins.  It has a crunchy top and lots of apple pieces.
 Ingredients:

Topping:
1/2 cup firmly packed brown sugar
1/3 cup all-purpose flour
1/4 cup unsalted butter, melted
1 tsp cinnamon

Muffins:
1 1/2 cup firmly packed brown sugar
2/3 cup vegetable oil
1 egg
1 1/2 tsp vanilla
2 1/2 cup all-purpose flour
1 tsp baking soda
1/4 tsp salt
1 cup buttermilk
2 peeled diced apples
 In a small bowl mix together brown sugar, flour, butter and cinnamon for topping until crumbly; set aside.
 In a large bowl whisk  together brown sugar, oil, egg and vanilla until smooth.
 In a separate bowl, sift together flour, baking soda and salt.
 Stir oil mixture into flour mixture alternately with buttermilk.
 Fold in apples mixing until combined.
 Spoon into greased muffin cups filling 3/4 full.  I make regular and mini sized muffins for the boys.
Sprinkle topping over evenly.
Bake at 350 degrees for 25-30 minutes or until golden brown.
Wait for them to cool a bit before removing from the pan as they are hard to get out when warm. 
Enjoy!!

Linked up to Tasty Tuesday!

Friday, August 5, 2011

Freebie Friday

I received a couple fun freebies in the mail this week.  My boys were excited to open the Colgate toothpaste sample because it has Sponge Bob Square Pants on it.  It will be perfect for our trip to Disneyland.
I also received a$2 off Tide coupon and a Free Herbal Essence coupon that I signed up for on Facebook.
It is always so much more fun opening the mailbox when there are freebies inside and not just bills.

Thursday, August 4, 2011

Thrifty Thursday

I didn't make it to a thrift store this week but I was able to go to a few yard sales.  I will be so sad when yard sale season is over.  It is something a look forward to every Saturday.
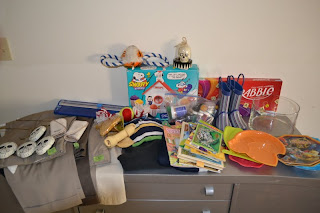
My favorite find of the week was the men's dress pants for $2 a pair.  They are name brand and still had the dry cleaning tags on them.  They fit perfectly on my husband.  My boys loved the Snoopy snow cone machine that I got for 50 cents.  I also found a scrabble game (which I plan to make necklaces with), a bag of glitter and a paper cutter all for $1 each.
Only two more days until I can go to more yard sales.

Wednesday, August 3, 2011

Crafting with your Kids: Watermelon Plates

Happy National Watermelon Day!
In honor of Watermelon Day my boys and I made a watermelon craft.  It was very easy and we had all the supplies on hand.

You will need:
black & red construction paper
paper plate
scissors
glue
green crayon
something small to trace around- I used a small glass bowl
Start by coloring the edge of the paper plate with the green crayon.  This will be the rind.
While the kids are coloring, trace around the glass bowl.  The circle should fit in the center of the paper plate. 
 Cut out the circle.  This is a great project if your kids are learning to cut.
 Put glue on the back of the red circle and stick to the center of the paper plate.
 Cut out small black "seeds" and glue to the red paper.
After the glue was dry my boys used these as play food in their kitchen.

Tuesday, August 2, 2011

Watermelon Frosty

I recently froze a bunch of watermelon to have on hand to add to smoothies.  My boys were wanting something to drink today so I threw together this quick and easy watermelon frosty.  You can find my post of how to freeze watermelon here.
Ingredients:
2 cups frozen watermelon
1 banana
2 Tbsp sugar
juice from one lemon
1/2 -1 cup water (depending how thick you like it)

Place all the ingredients in blender and blend until smooth.  Add more water if it is too thick.  Enjoy!!

How to freeze watermelon

Tomorrow is National Watermelon Day.  To celebrate I will be sharing a Watermelon Frosty recipe and instructions on how to freeze watermelon.  Tomorrow I will share a watermelon craft that my kids made.
 Take a watermelon and cut it in half. 
 Cut each half into 8 sections.  This makes it easier to cut so you don't get the rind.
 Once the melon is cut away from the rind, cut it into "sticks" and then into chunks.  Put them on a cookie sheet and freeze.  This keeps them from sticking together in the baggie.
 Once the watermelon chunks are frozen, place them in a big freezer bag labeled with the date.  Place a straw in the end and seal up the bag around it.  Suck the air out of the bag through the straw then pull the straw out and seal the rest of the bag.  This allows you to get as much air out as possible.
 Now you have frozen watermelon chunks that are ready to be added to smoothies, frosties or eaten as is.
Now is a great time to freeze watermelon.  They are at the lowest price of the season and taste sweet and yummy.

Monday, August 1, 2011

Buffet Redo

While looking through some pictures I came across this one of our buffet before we refinished it.  It brought back a lot of memories.  Before my husband and I were married (8 years ago) we found this piece in an old antique shop in Texas.  We instantly fell in love with it.  The top drawer has a green velvety lining and it has a very distinctive smell.  It had brown paint on it that was peeling off and really ugly wood handles.  We took this piece home for $75 with big plans to refinish it over Christmas weekend.
 After removing the old paint and handles, sanding, staining and adding new handles, we ended up with this gorgeous piece.  After 8 years it is still my favorite piece of furniture that we own.  Now if I can just get my boys to stop storing their Play Doh in there life would be great.